Lesson 1 – Importing Sample Data
In this tutorial, we will use SQLThing’s Import feature to load data onto your AS/400.
Start SQLThing. Select the File menu and then press New to create a blank SQLThing document. You are now ready to issue queries, create tables, etc.
In the blank editor window, type
CREATE DATABASE SQLEXAMP;
Now, move your cursor back into the text of the SQL statement and choose Statement->Execute If all goes according to plan, you will have created a new library on your AS/400 or DB2 Universal Server. Note that if you do not elect to create a library, you will need to replace the text SQLEXAMP with the name of the library you choose to sue for these examples.
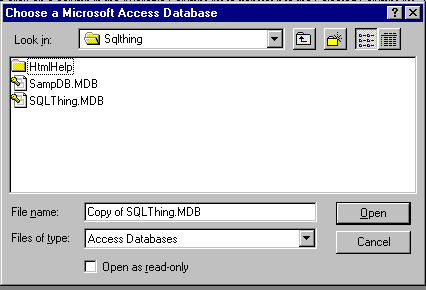
Next, Select Import->Access from the Tools menu. A dialog like the one shown in Figure 1 should appear. Use your mouse to select SampDB.MDB and then press Open.
SQLThing will open that database, as long is it is not in use by another application, and present a screen like Figure 2.
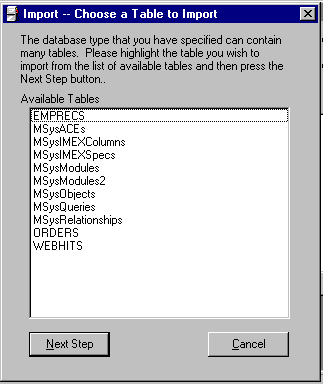
The Choose a table to import dialog allows you to choose a table name from the opened database. Click the mouse cursor on the ORDERSDET table and press Next Step.
Now you are looking at a list of columns in the ORDERSDET table, (Figure 3). Double clicking a column name will cause the column to appear in the selected columns list. Pushing the right arrow will copy all columns to the selected columns list. To remove a column from the list, you double click the column.
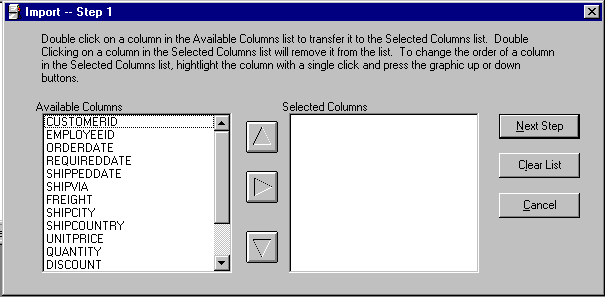
Use the right arrow to select all columns and press Next Step. You should now see a screen similar to Figure 4. Here you need to enter the name of the library, (database), and table name where you wish this data to go. Enter SQLEXAMP and table name of ORDERSDET.
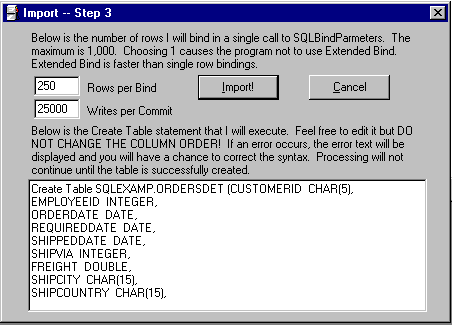
Once you have entered a library and table name, press Next Step to see the final import screen. This screen allows you to change the name or type definitions that SQLThing will use when it creates the target table. It is VERY IMPORTANT that you do not change the order of the columns in the create table statement.
Notice the Rows per bind and Rows per commit text boxes. Here you may adjust how many rows SQLThing will use in extended insert buffers and how many rows will be written before you issue a commit. As different versions of DB2 have different rules on open transactions, I recommend that you stay with 25,000 writes before a commit. This should work with all versions.
Number of rows per insert is a different story. If the number of bytes per record is very large, I recommend leaving it at 250 or maybe even smaller. If the records are small, you may adjust the number up to a limit of 1,000.
You may change the data type of individual columns and event the name of the fields. SQLThing automatically picks up field names from the database it is importing from. Sometimes, these field names are not appropriate to DB2. If SQLThing can not create the target table, you will be told why and allowed to correct the situation and attempt to proceed again.
To start the import, press Import! SQLThing will keep you informed of the progress of the import via a dialog. After the import is complete, SQLThing will tell you how many records were imported and the records per second.